Have you ever found yourself frustrated with your blender, struggling to achieve the perfect consistency for your culinary creations? Perhaps your salsa turned out too smooth, or your ice cubes weren’t crushed quite right for that refreshing drink. The secret to unlocking your blender’s full potential lies in understanding its core functions: pulse and continuous blending. These two fundamental techniques, though seemingly simple, offer distinct advantages that can elevate your cooking, ensuring your recipes achieve precisely the texture you desire.
This comprehensive guide will demystify the pulse and continuous blend settings, detailing how each works, when to apply them for optimal results, and providing expert tips to transform your kitchen experience. Get ready to take complete control over your blending, making every dish easier, faster, and more precise.
Understanding Your Blender’s Core Functions
Every blender, from the simplest personal model to a high-powered professional unit, typically offers both pulse and continuous blending options. While both engage the blades to process ingredients, their operational mechanisms and ideal applications differ significantly, influencing the final texture of your food.
What is Continuous Blending?
Continuous blending is exactly as it sounds: the blender motor runs non-stop at a consistent speed once activated. This mode is designed for prolonged operation, creating a powerful, consistent vortex that continuously pulls ingredients into the blades.
Mechanism: When you select a continuous speed setting (e.g., low, medium, high, or specific functions like “smoothie”), the blender maintains that speed until you manually turn it off. The blades spin uninterrupted, ensuring ingredients are broken down evenly over time.
Primary Use: Continuous blending excels at achieving smooth, uniform textures. It is the go-to setting for recipes where a completely integrated, lump-free consistency is paramount.
Pros:
- Efficiency for liquids: Quickly creates smooth liquids and purees.
- Consistent results: Ensures even breakdown of ingredients throughout the mixture.
- Hands-free operation: Once set, you can often step away for a moment.
Cons:
- Risk of over-processing: Can easily turn chunky ingredients into a thin, watery liquid if left too long.
- Heating ingredients: Prolonged blending can generate heat, which might alter the flavor or temperature of delicate ingredients.
- Air incorporation: Can incorporate more air into mixtures, potentially leading to foamy textures for some recipes.
|
Our Picks for the Best Blender in 2026
As an Amazon Associate I earn from qualifying purchases.
|
||
| Num | Product | Action |
|---|---|---|
| 1 | Ninja Professional Plus Blender | Max Power Smoothie Blender, Ice Cream Maker, Frozen Drink Mixer & Margarita Machine | 3 Auto IQ™ Presets, 1400 W, 72oz Total Crushing Pitcher | Dark Grey, BN701 |

|
| 2 | Magic Bullet Blender, Small, Silver, 11 Piece Set |
|
| 3 | nutribullet Full-Size Blender Combo 1200W – NBF50500 - Dark Gray |
|
| 4 | BLACK+DECKER PowerCrush Multi-Function Blender with 6-Cup Glass Jar, 4 Speed Settings, Silver |
|
| 5 | BLACK+DECKER Crush Master Blender, 10-Speeds with Stainless Steel Blades, Black, BL2010BP |
|
| 6 | Ninja Professional Blender, Smoothie Blender, Drink Mixer, Grinder, Ice Crusher, Frozen Fruit Blending | Professional 1000 W Power, Total Crushing ™ Technology, XL 72-oz. Pitcher Black, Grey, BL610 |
|
| 7 | bella 10 Speed Countertop Blender, Juicer & Smoothie Maker, Fits-anywhere™ Kitchenware, Slim Flip & Store Design, Dishwasher Safe 48oz Capacity Pitcher & Lid, Stainless Steel Blade, 450 Watt, Oatmilk |
|
| 8 | Aeitto Blenders for Kitchen with 1800W Motor, 68Oz. Large Capacity, 2-in-1 Blender & Grinder Combo, BPA-Free Countertop Professional Blender for Smoothies, Ice Crush, Frozen Drinks, Black |
|
| 9 | Ninja UltraCrush Professional Blender | 1000W, XL 72-oz.* Pitcher | Total Crushing Technology | 3 Manual Speeds for Ice Crushing, Smoothies, Sauces & More | Full-Size Blender | Black | BP201 |
|
| 10 | Hamilton Beach Power Elite Wave Action Blender For Smoothies, 40 Oz Glass Jar, 12 Functions Including Puree, Crush Ice, 700 Watts - Black (58148A) |
|
What is Pulse Blending?
Pulse blending offers a more hands-on, controlled approach to processing ingredients. Instead of continuous operation, the pulse function delivers short, intermittent bursts of power, allowing you to manually control the duration and intensity of each blend.
Mechanism: The pulse function works by running the blender motor only while you press and hold the button. Releasing the button immediately stops the blades. This allows ingredients to fall back down onto the blades between bursts, ensuring a more even and less aggressive processing.
Primary Use: Pulse blending is ideal for precision control, achieving coarse textures, chopping, crushing, or gently mixing without the risk of over-processing. It’s particularly useful for tasks that require careful handling of ingredients or when you want to retain some texture.
Pros:
- Prevents over-blending: Gives you precise control to stop blending the moment the desired texture is achieved, preventing ingredients from turning into mush.
- Preserves texture: Excellent for maintaining chunks in recipes like salsa, pesto, or chopped nuts.
- Ideal for delicate ingredients: Gently incorporates herbs or chocolate chips without pulverizing them.
- Efficient ice crushing: Short, powerful bursts effectively break down ice without continuously running the motor, which can cause overheating or melt the ice too quickly.
- Gentle mixing: Good for folding in delicate ingredients or for kneading small batches of dough.
Cons:
- Requires constant attention: You must actively press and release the button, making it less hands-free.
- Slower for smooth purees: Achieving a completely smooth puree with pulse blending would be tedious and less efficient than continuous blending.
When to Engage Continuous Blend for Perfect Smoothness
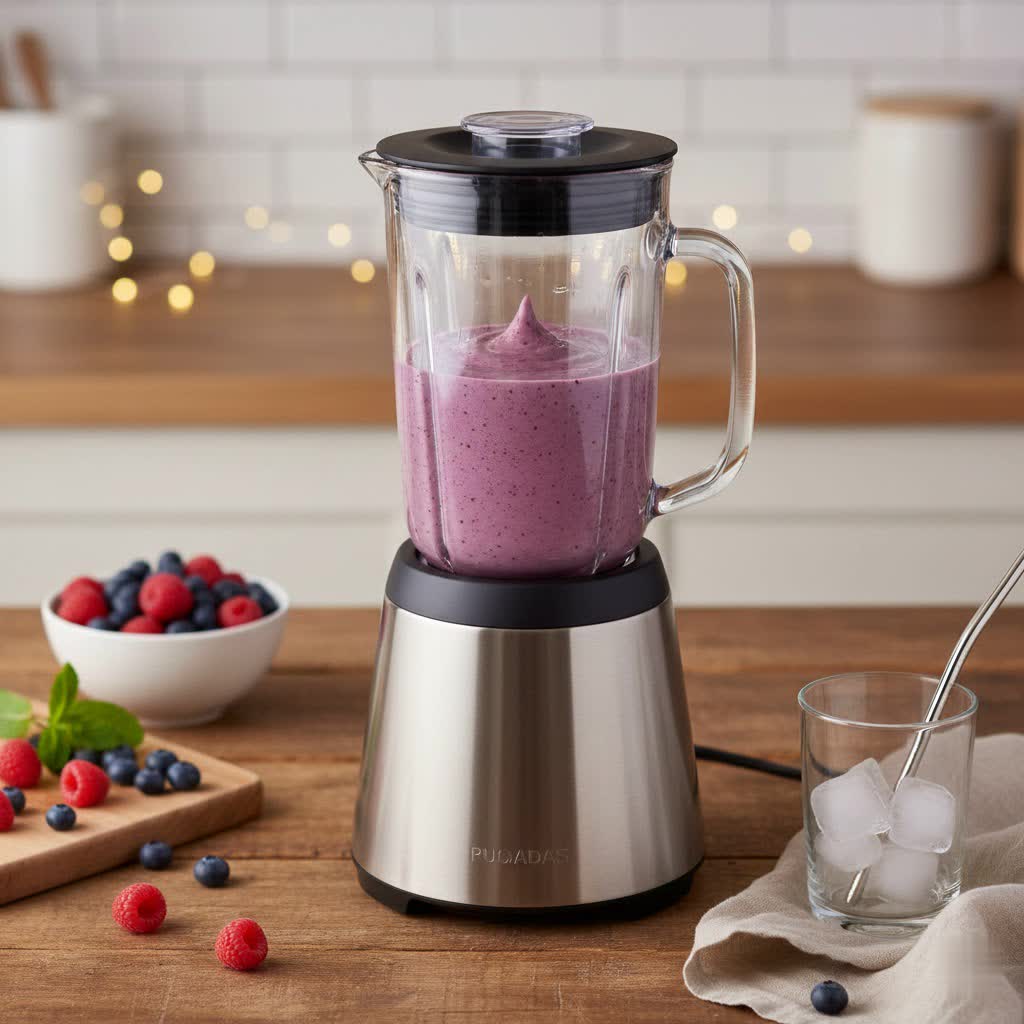
Continuous blending is your go-to setting when uniformity and smoothness are key. It allows the blender’s powerful motor and sharp blades to work uninterrupted, breaking down ingredients thoroughly and creating a consistent texture.
Achieving Velvety Smoothness: Smoothies, Soups, and Purees
For recipes where a silky-smooth consistency is the ultimate goal, continuous blending is indispensable.
- Smoothies: To achieve a velvety, drinkable consistency from fibrous fruits, vegetables, and ice, continuous blending is essential. It ensures all ingredients are thoroughly pulverized and integrated. Start on a lower speed to break down larger chunks, then gradually increase to a higher speed for a perfectly smooth finish.
- Creamy Soups: After cooking, many vegetable soups benefit from a continuous blend to create a luxurious, lump-free texture. This works especially well for pureed squash, tomato, or potato soups.
- Sauces and Purees: Whether you’re making a fruit puree for desserts, a smooth tomato sauce, or a creamy hummus, continuous blending ensures every component is finely processed and evenly mixed.
Homogenizing Ingredients: Batters, Dressings, and Nut Milks
Continuous blending is also perfect for ensuring that mixtures with multiple ingredients are completely uniform, preventing separation and creating a cohesive product.
- Batters: For thin batters like those for pancakes, waffles, or crêpes, continuous blending quickly eliminates lumps and ensures all ingredients are well combined.
- Salad Dressings: Emulsifying oil and vinegar, along with herbs and spices, is best done with continuous blending to create a stable, creamy dressing that won’t separate quickly.
- Nut Milks: When making homemade almond, cashew, or oat milk, continuous blending is crucial for extracting the maximum flavor and nutrients from the nuts or grains and achieving a smooth, consistent liquid.
Mastering the Pulse Function for Texture and Control
The pulse function is a blending game-changer for anyone who values control and specific textures. It empowers you to dictate the exact consistency of your ingredients, from coarsely chopped to gently combined.
Precision Chopping and Coarse Textures: Salsa, Pesto, and Breadcrumbs
When you want to chop ingredients rather than liquefy them, the pulse function is your best friend. It provides the quick bursts of power needed to cut food without turning it into an unrecognizable paste.
- Salsa and Dips: For a chunky salsa where you want distinct pieces of onion, tomatoes, and cilantro, pulsing allows you to achieve the perfect texture. A few short pulses can transform whole vegetables into a rustic, satisfying blend.
- Pesto: When making pesto, the pulse function helps you control the texture of the basil, nuts, and cheese, ensuring a vibrant, slightly coarse consistency rather than a completely smooth sauce.
- Breadcrumbs: Turning stale bread into fresh breadcrumbs is effortless with the pulse function. It allows you to create uniform crumbs, from coarse to fine, without over-processing them into a paste.
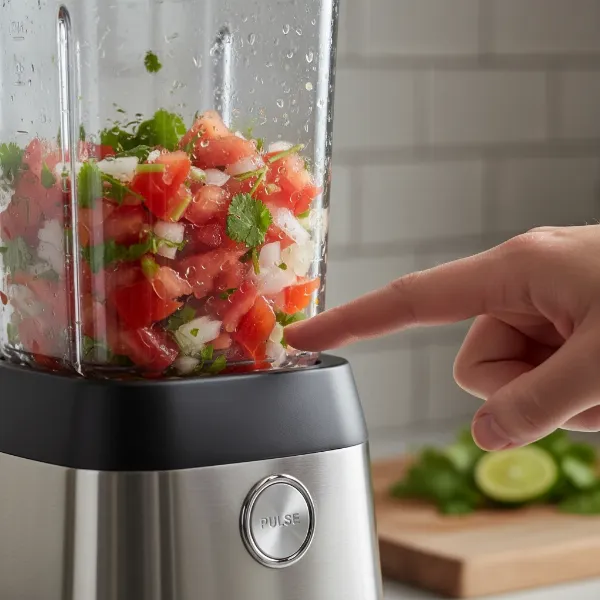 A person using the pulse function on a blender to chop vegetables for salsa, showing distinct chunks of ingredients.
Crushing Ice and Incorporating Delicate Ingredients
Beyond chopping, the pulse function is invaluable for tasks that require a delicate touch or bursts of high power without sustained blending.
- Crushing Ice: If you need crushed ice for cocktails or refreshing beverages, the pulse function is superior to continuous blending. Short, powerful pulses break down ice cubes into ideal, uniform pieces without melting them too quickly or overworking the motor.
- Mixing Dough: For quick breads, scones, or cookie dough, a few pulses can gently combine dry and wet ingredients without over-developing gluten, resulting in tender baked goods.
- Incorporating Delicate Ingredients: Adding delicate items like chocolate chips, fresh herbs, or soft berries into a mixture without completely breaking them down is easily achieved with a few gentle pulses at the end of the blending process.
Expert Tips for Optimizing Your Blending Techniques
Mastering your blender goes beyond simply knowing what the buttons do. Smart preparation and troubleshooting can make all the difference in your blending success.
Prepping Ingredients for Better Blending
The way you prepare and load your ingredients can significantly impact blending efficiency and the final outcome.
- Cutting Ingredients: Cut larger, harder ingredients into uniform, smaller pieces (around 1-inch chunks). This ensures they blend more evenly and reduces strain on your blender’s motor.
- Layering Ingredients: For optimal blending, layer your ingredients strategically. Start with liquids (water, juice, milk), followed by soft fruits and leafy greens. Next, add harder items like frozen fruits or ice, and finally, any powders or thick ingredients. This layering helps create a vortex that pulls solids down into the blades effectively.
Troubleshooting Common Blending Challenges
Even with the right technique, you might encounter issues. Here’s how to address them:
- Blades Spinning Without Blending (Cavitation): This often happens when there’s too little liquid, or the container is packed too tightly with solids or ice. Stop the blender, add a little more liquid, or use a tamper (if your blender has one) to push ingredients down towards the blades. A few pulses can also help dislodge stuck ingredients.
- Over-blending: Recognizable by a gummy, overly smooth, or even slightly warm texture, especially with ingredients like nuts or oats. Prevent this by using the pulse function for precise control and checking consistency frequently.
- Under-blending: If your mixture still has large chunks or an uneven texture, you might need more blending time or higher speed for continuous blending. Ensure there’s enough liquid to facilitate smooth movement of ingredients.
Blender Maintenance and Safety
Proper care ensures your blender lasts longer and operates safely.
- Cleaning: Always unplug your blender before cleaning. For most containers, a quick rinse immediately after use is best. For tougher residue, fill the pitcher halfway with warm water, add a drop of dish soap, and run on a low continuous speed for 30 seconds, then rinse thoroughly.
- Safety: Never overfill the blender past the “Max Fill” line. Always secure the lid tightly before operating. Avoid putting your hands or utensils into the blender jar while the motor is running.
Choosing the Right Blender for Your Blending Style
The ideal blender for you will depend on the types of recipes you make most frequently and your preferred blending style. Consider these factors when selecting a new blender or evaluating your current one.
- Power (Wattage): Higher wattage (typically 1000 watts and above for continuous blending, or strong burst power for pulse) is crucial for consistently blending tough ingredients like frozen fruits, hard vegetables, and ice without straining the motor. If you primarily make smoothies and purees, a higher-powered continuous setting is beneficial.
- Container Material and Size: Glass jars are durable and scratch-resistant but heavier. Plastic (BPA-free) is lighter and less prone to breaking. Choose a size that accommodates your typical batch sizes; personal blenders are great for single servings, while larger pitchers suit families.
- Blade Design: Look for robust, multi-pronged blade assemblies, often made of stainless steel. Blade design influences how effectively ingredients are pulled into the blending vortex.
- Settings: Does the blender offer clearly marked pulse buttons or variable speed dials? Some blenders integrate pulse into a single variable speed dial, requiring you to quickly twist it on and off. Dedicated pulse buttons offer straightforward control. If you love texture in your food, a prominent, easy-to-use pulse function is a must-have.
Conclusion
Understanding the difference between pulse and continuous blending is a fundamental skill for anyone who uses a blender. Continuous blending is your ally for achieving effortless smoothness, ideal for velvety soups, silky purees, and perfectly emulsified dressings. In contrast, the pulse function empowers you with precise control, allowing you to create satisfyingly chunky salsas, perfectly crushed ice, and gently mixed batters without fear of over-processing.
By intentionally choosing between these two modes, you gain the ability to master a wide array of textures and unlock a new level of culinary creativity. So, the next time you reach for your blender, remember these techniques and confidently craft dishes with the exact consistency you envision. What delicious texture will you create next?
Frequently Asked Questions
Can I use pulse for smoothies?
While continuous blending is generally recommended for the smoothest smoothies, you can use the pulse function to initially break down large frozen fruits or ice cubes before switching to continuous blending. This can help prevent the motor from stalling and ensures a more even start to your smoothie.
Is it okay to run my blender on continuous for a long time?
It is generally okay to run a blender on continuous for the time needed to achieve your desired consistency, typically a few minutes at most. However, prolonged continuous blending can generate heat, which may degrade certain nutrients, alter the taste of delicate ingredients, or even cause some motors to overheat. Always refer to your blender’s manual for recommended continuous run times.
What’s the difference between a pulse button and a variable speed dial?
A dedicated pulse button provides instant, full-power bursts that stop immediately when released, offering maximum control. A variable speed dial, on the other hand, allows you to incrementally increase or decrease the blending speed continuously. Some blenders may have a “pulse” option on the variable speed dial, where you quickly turn the dial to the pulse setting and release, mimicking a button.
Can I make nut butter using the pulse function?
Yes, the pulse function is excellent for starting nut butter. It helps to break down whole nuts into smaller pieces before you transition to continuous blending. For a creamy nut butter, you’ll eventually need to use continuous blending to process the nuts until their natural oils release and form a smooth consistency, scraping down the sides of the jar as needed.